
Getting Started (For School Administrators)
Step 1: Create your classrooms: Add in names for all the classes that will use the account.
Step 2: Assign yourself to classrooms (if you also teach).
Step 3: Import Teachers: Import your list of teachers using the template and send them their login details.Step 4: Import Students: Import your list of students using templates.
Step 5: Review Placement Level or Assign Reading Level.
Step 6: Online Resources: Download and distribute Student Access Cards and Parent Letters.If you have any questions, please type your question in the search field which is located at the top of the page. If you still require assistance, please select Submit Ticket in the top right corner to contact our support team.
- Navigate to the main menu, and click on the Classrooms section.
- Click on Add New Classroom.
- Type the name of your classroom in the Classroom field.
- Choose the Year Level. You may select multiple year levels if required.
- The Description field is optional.
- Navigate to the main menu and click on the Teachers section.
- Click on View Teacher List.
- Choose the Account Type and Status and click on the Submit button.
- Locate your details in the table list.
- On your row, under the Actions column, click on Actions and then Edit Teacher.
- Once you have redirected to the Edit Teacher Account page, you may type or choose the name of the classroom that you are assigned to from the dropdown menu in the Classrooms field. You may assign yourself to more than one classroom.
- Click on the Submit button.
STEP 3: Import teachers
If there are other teachers that are using the program, you will have to add their details into the system. The most efficient way is to use a CSV Template to import teacher details in bulk. As a School Administrator, you can perform all the functions of a Teacher account and you are not required to create another, separate Teacher account for yourself.
- Navigate to the main menu, and click on the Teachers section.
- Click on Import Teachers.
- In the What Would You Like to Do? section, choose Import New Teacher Details.
- Click on the View Instruction Guide button to read the instructions.
- Complete the CSV Template using Microsoft Excel.
- Choose and upload the completed CSV Template file.
- Click on the Submit button.
STEP 4: Import students
Once you have completed the steps described above, as a School Administrator, you will also need to import your students’ details.
- Navigate to the main menu, and click on the Students section.
- Click on Import Students.
- In the What Would You Like to Do? field, choose Import New Student Details.
- Click on the View Instruction Guide button to read the instructions.
- Complete the CSV Template using Microsoft Excel.
- Choose and upload the completed CSV Template file.
- Click on the Submit button.
STEP 5: Review Placement Level or Assign Reading Level
You're almost there.
- Navigate to the main menu and click on the Reading Levels section.
- Click on the View Reading Level List link.
- Choose an appropriate Classroom from the Classroom field.
- Choose All option from the Current Reading Level field.
- Click the Submit button.
- To assign a reading level to an individual student, move your cursor onto the student’s row and, under the Action column, click on the Manage Reading Level button.
- In the What Would You Like to Do? field, choose Assign Reading Level.
- Choose a Reading Level from the Reading Level field.
- Click on the Submit button.
- To assign a reading level to a group of students, select the checkbox next to each student’s details and click on the Mark button found on the bottom of the page, ensuring that you have the correct number of students selected.
- In the What Would You Like to Do? field, choose Assign Reading Level to the selected students.
- Choose a Reading Level from the Reading Level field.
- Click on the Submit button.
- To assign a reading level to the whole class, click on the View All button and then the Select All button.
- Click on the Mark button, ensuring that you have the correct number of students selected.
- In the What Would You Like to Do? field, choose Assign Reading Level to the selected students.
- Choose a Reading Level from the Reading Level field.
- Click on the Submit button.
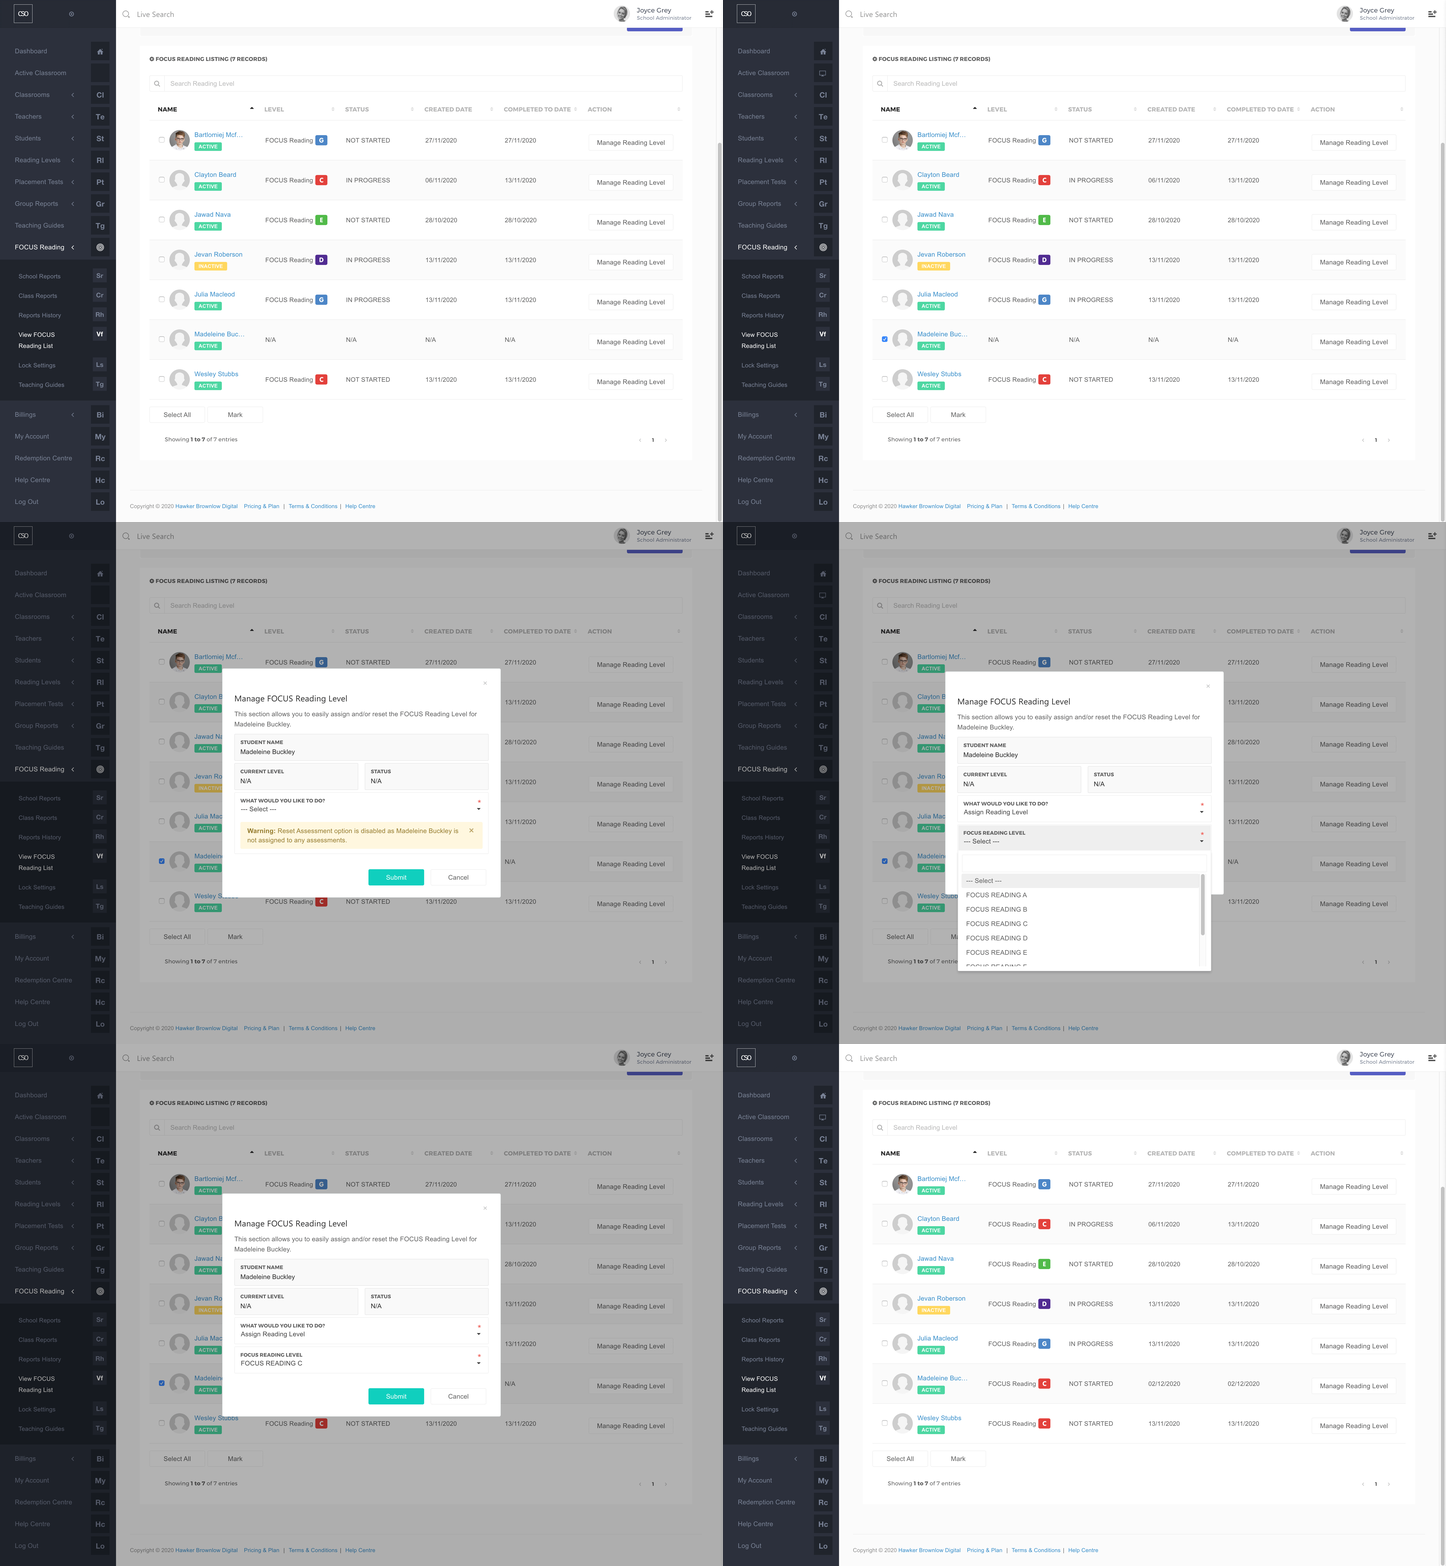
- Navigate to the main menu and click on FOCUS Reading, then View FOCUS Reading List.
- Choose an appropriate classroom from the Classroom field.
- Choose the All option from the Current Reading Level field.
- Click the Submit button.
- To assign a reading level to an individual student, move your cursor onto the student’s row and, under the Action column, click on the Manage Reading Level button.
- In the What Would You Like to Do? field, choose Assign Reading Level.
- Choose a reading level from the Reading Level field.
- Click on the Submit button.
- To assign a reading level to a group of students, select the checkbox next to each student’s details and click on the Mark button found on the bottom of the page, ensuring that you have the correct number of students selected.
- In the What Would You Like to Do? field, choose Assign Reading Level to the selected students.
- Choose a reading level from the Reading Level field.
- Click on the Submit button.
- To assign a reading level to the whole class, click on the View All button and then the Select All button.
- Click on the Mark button, ensuring that you have the correct number of students selected.
- In the What Would You Like to Do? field, choose Assign Reading Level to the selected students.
- Choose a reading level from the Reading Level field.
- Click on the Submit button.
STEP 6: Online Resources
To allow your students working from the printed CARS and STARS books to easily access the system you will have to download and print out the Student Access Card for each of them. Once you have printed out the Student Access Card, please cut and paste it onto the student’s book.
- Navigate to the main menu, and click on the Classrooms section.
- Click on View Classroom List.
- Click on the Download Whole-School Resources button.
- Click on the resource that you would like to download. For example, School List, Parent Letters and Access Cards.
- Choose a classroom row and, under the Action column, click on the resource that you would like to download. For example, Class List, Parent Letters and Access Cards.
- Make sure no one else is logged onto the program on your computer.
- To log someone else out, click the top right of their username and select Logout from the menu.
- Go to https://app.carsandstars.com.au and click on Students to switch to the student login and enter the access code. Your student can login with their issued access code, listed on the Student Access Card.
- Click Login.